
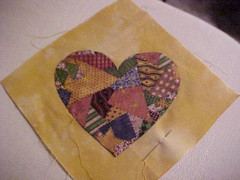
Today at our monthly meeting one of our members taught us all how to do a spray starch applique method. This is a picture of the heart I did. I haven't finished appliqueing it down to the background yet because I had to stop when I got a teeny knot in my thread. Had to cut & restart and it was too close to time to go home!
This technique is SO easy and you get such a nice sharp applique with it. What you do? Perhaps some haven't heard of this technique, so I'll try to explain:
The very first thing you have to do to prepare is to spray some spray starch into a little bottle (i.e. baby food) and let it sit so it liquifies. Then:
1) Iron two pieces of freezer paper together shiney side to dull side, so you have one shiney side exposed. The size will depend upon what size shape you are doing. For our hearts we used 6" squares.
2) Carefuly & smoothly cut out your shape from the double paper
3) Iron your shape shiney side down to the wrong side of your fabric.
4) Trim away the excess from your shape leaving 1/4 to 3/8" excess all around.
5) Heat up a little clover iron or versa-tool w/ironing foot on and use a small paint brush to paint the liquid starch on the exposed extra fabric. Begin on "a straight-away" going about 2" at a time.
6) Use your little iron to carefully flip and press the starched area over onto the freezer paper shape. Press and hold. Press and hold. Do it in each area until the starch dries and your shape has a fine edge.
7) When you have the entire shape done, press it well with a regular iron and let cool. Press, don't iron. Don't move the iron back & forth. Let it cool.
8) Using little scissors, on the backside, trim the excess to less than a 1/4". Press again. Always press from the backside!
9) Peel back the turned over area in a small area and start peeling the freezer paper away. What you are left with is a perfectly formed applique!
10) When we decided where we wanted to position our hearts, we carefully lifted areas of it up and applied tiny dots of "applique glue" with a toothpick away from the edge around the whole shape about every 1". This is just to keep it tacked while you hand stitch the applique down.
Everyone LOVED their heart when we finished. As you can see, I used a piece of faux cq fabric for mine. Others used red fabrics for a Valentine piece and still others had pieced a 6" piece of fabric with a small faux cq silk in the center. Their's turned out really different and I kind of wished I'd thought of doing that myself.
Another hit of today's meeting seemed to be my 2 new copies of Country Threads magazine. It's an Australian magazine that leans heavily to stitchery & redwork and everyone spent a lot of time pouring over these new issues I just received this week. In December I finally decided to stop driving in all directions to find issues of this wonderful magazine, so in December I offered up my Visa card to the No.American distributor and ordered a subscription for myself. Merry Christmas to ME!
Stitch on!


I have been gone..............
15 years ago


