Tuesday, May 27, 2008

Take It Further - April Block

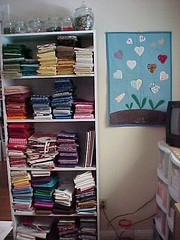
Still trying to catch up around here with all the organizational activities and stitching obligations. Today, while G was away for the whole day playing golf, I managed to move my computer system into the workroom onto my new much-smaller desk. Talk about crowded! Let's call it cozy, okay?

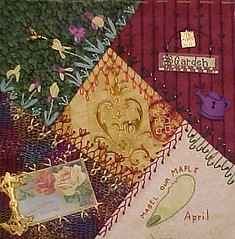
So, I finished the April TIF block a few days ago. If you click on the picture here, you can also see more detailed close ups of the 4 corners and center of the block in my Flickr pictures.

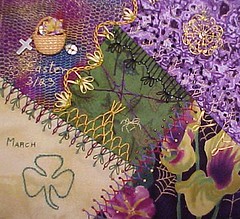
The JBM fabrics in this block are in the center and at the lower left. The center spider web this month is made of copper metallic machine thread and Mr. Spidey is brown made with one strand of cotton floss.

At upper left is some simple silk ribbon irises. Simple is the only SRE I do. Our iris gardens began blooming in April much to the delight of the hummingbirds who also came home to almost daily drain the feeders in April.

The fabric at upper right was not only chosen because it was one of April's colors, but also because I thought it could represent G's vegetable garden which he planted in early April. In fact, just yesterday, Memorial Day, we harvested our first squashes - 2 eight ball zucchini and 1 yellow zucchini. Now the fun begins trying to keep up with the squash production. No tomatoes yet, but the bushes are 3 feet high already! Squash and tomatoes are the only things G grows. When I used to do the garden we had beans, beets and radishes, but he only grows what he likes to eat!

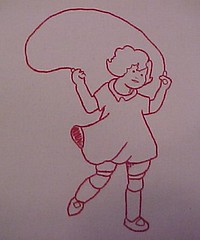
The birthday image at lower left was a freebie posted by Janet of Vintage Vogue and seemed most appropriate because on the last day of April I turned 66. One year on Medicare and I'm still kickin'.

On the lower right corner I tried to reproduce a seed pod from Mabel, our Maple tree. When we moved into this house, Mabel did little to shade our front window in the hot afternoons of summer. Now she is huge and every year in April she showers us with the "twirly bird" seed pods that the girl used to call "helicopters" and loved playing with.

The center stitching looks a little wierd I know, but I was doing my best to camoflage the fact that the center piece of fabric was not cut straight. You might not see it, but it's the only thing I could see after the block was pieced. Too lazy to repiece the block, I set about trying to hide the fact. There's not much special stitching on this month's block. I played a bit the my fly stitches on top of the birthday corner and the green line of stitching over Mabel is a stitch I found on an antique crazy quilt this month that I had not seen before.

Enjoy the close ups!

Stitch On!

Sunday, May 25, 2008

This thing called My Life Quilt


Life Quilt Block #1
Originally uploaded by lasassone
Sometime ago I decided I wanted to make an old traditional redwork coverlet similar to those made in the early days of redwork embroidery history. As I thought about it, two ideas started to take shape in my mind. One, which I have now started, is composed of images that remind me of happenings in my life from birth on. This series of blocks will be all done in red. Some will be images I've collected over the years from internet site, some will be made from pictures that I find and others will be taken directly from photos from our family's albums.

The second idea, by the way, was to do my favorite vintage designs in colored embroidery stitches. I'm still collecting designs for this idea and perhaps I'll start the blocks after I have a good start on My Life Quilt.

I began calling this planned coverlet "My Life Quilt," but as I am thinking and stitching the designs, it might also be called "Sweet Memories". As I began choosing designs and stitching, the memories from my childhood began flooding back.

The other day when I emailed my older and only brother asking about the dog we had before we moved into the city, I asked some questions of him which prompted memories for both of us. After emailing back and forth all day, he asked me "You ARE writing all this down, aren't you?" In years past I think he had great ambitions of writing our family's story, but evidently that chore has fallen to me but it will be from MY perspective, not his.

Each of my redwork blocks will have a story behind it and I gather them into some kind of book or booklet that will accompany the finished quilt. I am not doing the blocks in any particular order, so they will be re-numbered when I get closer to finishing.

Life Quilt Block #1: When we moved into the city from our home in the country, I was only 4 years old and very shy from having never had any neighbor friends where I had lived before. I only had one friend who was the daughter of someone who worked for my father in his Jewelry store in time. Our mothers became friends and we often did things together. We are still friends today at age 66.

But I digress. When we moved into our wonderful house (which will become a block of it's own) there were a lot of neighbor kids and I watched them playing games together. They all knew how to jump rope but I did not. It was a struggle to learn with a bit of clothesline rope that was left over from when Dad strung the clothes poles for Mum with new rope. Throw it over my head to the ground, step over it and throw it again. I don't recall how long it took me to actually JUMP rope, but what a great feeling of accomplishment when I did. And, of course ahead of me lay learning all the wonderful rhymes and another challenge of learning to use a longer rope and group jump! I kept that short rope for many years through many moves. I even brought it with me when I was 10 and we moved to California where I could jump rope pretty much 12 months of the year because of there being no snow!

Friday, May 16, 2008

My Fabric Storage Room Uncensored!

Finally, you are probably saying to yourself! We have finally finished setting up the first room of my 2 room studio suite! Hey, I like that! I have a Suite! hmmmmm.

The photo below was taken from the doorway of what 23 years ago was my youngest daughter's bedroom. It's hard to believe this small 10 ft by 9.5 ft room held all the trappings of a pre-teen girl. After her older sister left for college, she moved into her sister's room which she thought was slightly larger. Slightly is the operative word. At best that room which is slowly becoming my workroom and the 2nd room in "my Suite", is about 10 ft by 10 ft.

From the door you can see part of the right wall which actually is lined with 4 tall bookcases. The top 3 shelves all along have various quilting cotton prints divided into themes which are written on those yellow cards you see sticking out. The bottom two shelves contain my binders of embroidery patterns and bundled UFO's.

Below the window in the center is a metal pattern cabinet which I purchased when a local fabric store closed down. The bottom drawer contains all my sewing and commercial embroidery patterns. The center drawer contains fat quarters of quilting fabrics. The top drawer holds miscellaneous craft supplies.

To the right of the pattern cabinet is a stack of 4 large drawers that each hold different items for crazyquilting. For instance, one holds all my metallic fabrics. On top of the pattern cabinet are 2 sets of little drawers - I actually have 3 of these - the third one is in the workroom. Next to them, on top of the 4 drawers is a new cabinet that I purchased last week at Home Depot. I'm waiting for the drawer dividers that had to be ordered and then I hope to consolidate all my "little things" into two of the new drawer units so that all my embellishments can be kept in this room.

In the center of this room you can see the cutting station that G built for me. I had this idea for some time and had hoped to have a larger one in a new home, but this will do for now. He bolted together 2 short bookcases back to back. Then we bought a white coated board slightly wider than my new cutting board and put it on top. You might be able to see that I have the cutting board clamped on so that it doesn't move. The extra width that isn't covered by the cutting board is great for laying notes, tools, etc. The back to back shelves of the base is handy and at present contain things that need my attention after we finish setting up the workroom.

Here is a picture taken from the corner to the left of the window. To the right of this picture is the doorway.
You can see above more of the themed fabric stacks, bundled UFO's and my downsized stash of Redwork, CrazyQuilt and Quilting books. On top on the left are plastic boxes which each contain different sized cuts of cotton squares and bricks. The suitcases on the top right contain linings, family quilt items and one of them is full of yellow crazyquilt fabrics. On top of the books are heavier fabrics for totes and purses.

Below is a picture taken from the doorway of my crazyquilt fancy fabric storage that is to the left of the pattern cabinet.
As you can see there are index cards in the front of each drawer with the color family name. On the bottom right you can also see that I am blessed with an OVER abundance of green fabrics. So much so that I cannot even close that drawer! I'm going to have to do something about that soon before they get dusty! On top of these drawers right now is a very unattractive naked board which will be dealt with later. On top the board is the ever present tv which is standing at the ready for when I spend loads of cutting time in this my Fabric Storage Room!

I have one other view of this room, but the picture needs to be turned and I can't figure out how to do that in Blogger's dashboard. So, I'm going to do a second post from Flickr where I have been able to turn the photo for you.

Thanks for visiting! Stitch On!

Additional View


Fabric Storage Room #3
Originally uploaded by lasassone
This is the wall to the left as you enter the Fabric Storage Room. The other half of the wall is the closet which G still lays claim to. For this picture, you can click on it to see a larger view and the notes that I put on the picture showing what is what.

On the top of the bookshelf are my button jars. Each contains a different color. The fabrics on these shelves are all cottons and are in "reads as" color groupings. The 2nd shelf from the bottom has a stack of Kaufman Kona cotton colors.

The little wallhanging was a college art class project. It's a memorial piece for my Mum who passed away right before I started the class. The hearts depict her children, grandchildren and great grandchildren at the time of her passing. It's title is "Lulu's Garden." I am the flower on the right, my brother is the center flower/heart and our older sister who died at birth is the folded heart on the left.

I hope you have enjoyed the tour of room #1 of my Studio Suite. Come back anytime!

Stitch On!

Thursday, May 08, 2008

Take It Further Challenge - March


March TIF Palette posted by Sharon B


Just today I finished the embellishment of my Take It Further Challenge block for March. I will now move on to embellishing the April block which is already pieced. I have my fabrics pulled for my May block, but I haven't pieced the block yet.

On this block, as the previous ones, I have embroidered thename of the month and there's a web & spider in the center. I tried using a heavier thread for the web and I really don't like it as much as I like using the metallic threads. The spider is made with one strand of DMC cotton floss.

I did the clover for St. Patrick's Day and put the date of this year's Easter under the basket of eggs and flowers. I did that because this is the first year that Easter has been this close to G's birthday which is March 24th. 68 years ago in 1940 he was born on Easter Sunday.
The Easter eggs are 2 hole oval buttons stitched on with colored pearl thread and the cross is one of a bunch of mother-of-pearl that I won in an eBay auction years ago.

The gold piece on the upper right is a piece of an old earring with a rhinestone in the center. I thought it was rather like the sun shining down on this block. March is when flowers began to respond to the erratic bouts of sunshine we have here in No. California.

The Judith Baker Montano fabrics in this block are the ones at upper left and lower right. Every month there seems to be a lot of her fabric line that goes well in my blocks. It would pretty easy to even build the whole block around them.

So, now it's on to some work on the last block of a round robin that I have been participating in and then I'll be embellishing the April block. I have added 3 close up pictures of the March block below. First is the Easter basket area, 2nd is the earring medallion and the last one is of the center spider and his clunky web:


Stitch On!

Wednesday, May 07, 2008

Final block of Chocolage DONE!

Well, there you have it! All 16 blocks of the Chocolage design set are done. In the next several days I will be working on the layout for the blocks. The Chocolage Design book includes a layout for a quilt top, being the contrary person I've always been, I will be doing my own "thing" with these blocks.

By way of answered some questions that have been asked about the fabric on which I did the designs, I want to say here that it is called "Alison by P & B Textiles." It's still available in a few places online because the other day I found some for someone who asked. I either found it by googling the name OR by putting the name in the Fabric Shop Search site. I am not sure which.

For this quilt top, I have a great chocolate themed fabric and 3 coordinates I will use. The blocks will be bordered with two of the colors that are in the theme print and I think the final layout will involve some very chocolate cornerstones. Of course once I get going with the graph paper, who KNOWS what the final product will look like?

Stay tuned & Stitch On!

Monday, May 05, 2008

Where I've been and What I've been doing!

Hey! I'm back and happy to report that almost all of the boxes are now unpacked. There are just a few left and a couple of wardrobe boxes but they have things in them like quilt batts, zipper bags of yarn, my mother-in-law's and my grandmother's quilts and some bedding. Haven't figured out where those things are going yet. I want to get my two rooms done first.

Right now G is framing and getting ready to install a 2 ft. by 4 ft. section of pegboard for over my computer desk in the workroom. Above that will be two 72" shelves that we have yet to buy. And after that, IT WILL BE ALL DONE and pictures WILL be taken!

So! What have I been doing? Well, get comfortable and I'll tell you.....

Sometime ago on a blog or website I read a hint about a nifty little thing that Home Depot sells for 99 cents. They think it's a carpenter's apron, but this tip was about using it for a quilter's tool apron. When we were at Home Depot recently I purchased one. They look like this:


Simple little thing, no? It's only 2 pockets because it has a double row of stitching down the center of it. I really like this idea. Back a few years ago when I worked at a fabric store, we had to make something similar to this to carry our scissors around the store. While it's handy to have your scissors when you walk about the house, I actually thought I'd like something with more carrying capacity and this would work much better for me.
A couple days after I bought this apron, I had a meeting here at the house and my friends were touring my newly installed fabric room with it's custom cutting center that G built for me. The Home Depot apron was laying on the cutting station and someone asked what I had that for. I told them about the hint I had read. One gal said she wasn't so sure she wanted to wear an advertisement for Home Depot but then commented that I, no doubt, had plans to change that being that I embroider everything in sight!
I laughed outwardly but in my head I was thinking she was right! So, I went searching through my stash for something that I could applique over the Home Depot logo. I found a panel of what I think are supposed to be quilt labels. The panel is called Awakenings to Spring by Maywood Studios. I laid several of the designs over the Home Depot logo and found one I liked. Since the design had a blank center I then went looking for something I could embroider in the empty space. I wanted my initial "L" and found an L with a Lily of the Valley pattern I really liked. Here are 2 pictures, 1 of the whole panel and a close up of the square I chose after I had traced the embroidery pattern onto it & chosen the colors of thread I would use. Yes, I know I should have pressed the panel before the picture was taken, but I did it afterwards and before I started embroidering.


I added a muslin backing to the embroidery before hooping it so that the orange logo would not show through. It took me a few evenings to get the embroidery done, but during that time I also removed the stitching from the center of the Home Depot apron. Here you can see that and also the finished embroidery:


I then removed the basting holding the front and muslin together and trimmed the design. Then I cut another piece of muslin the same size. I placed the design face down on the new piece of muslin and sewed around all 4 edges with the exception of about 2 or 3 inches at the bottom of the design. In the picture below I hadn't finished sewing all around it yet because I wanted to make sure to finish it to fit the front of the apron. Also below is a picture of it pinned in place and ready to be sewn.

Finally, by sewing this on the front of the apron, I not only covered up the orange logo, but I created a 3rd pocket in the apron and the embroidered piece is actually a 4th pocket! Here is a close up of the sewn edges and a picture of me wearing my new spiffy sewing apron/caddy.


Should anyone else convert a Home Depot carpenter's apron, please let me know and send me pictures, okay?

Stitch on!